The 3 symptoms of bad barrel trimming and how to fix or avoid them
The 3 symptoms of bad barrel trimming and how to fix or avoid them
There is a group of problems that keep cropping up in pen making that are very frustrating to makers. These problems have different symptoms but the most common underlying cause is a misunderstanding of one of the most basic parts of the pen making process—barrel trimming. This guide is intended to cover the basics and underlying fundamentals of this step to avoid the issues that can result from misunderstanding. What are the symptoms of bad trimming? Symptoms include:
Symptom 1: Sticking Refills
This mostly effects pens where there is a potential choke point—a section where there is only a small amount of clearance for the refill to slide through, however, in extreme cases it can impact any design. Some of the center twist pens, like the Patriot, Southwest, and Classic have couplers with only a small amount of space to accept the refill. If the coupler is not aligned properly the refill is forced to bend in order to extend through the tip. The pressure from the mechanism can force this to happen, but it wedges the refill into the tip. When the mechanism is released the spring does not have the strength to un-wedge the refill and the refill sticks. These two patriot pens below are not trimmed straight. When fully pressed the refill is not centered, as can be seen in the right hand picture. The refill is not able to be pushed any closer to the center line because of the misalignment.
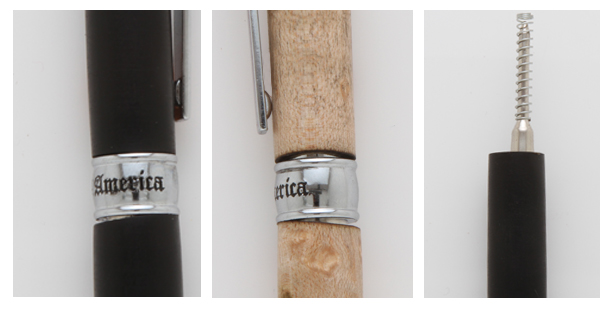
An easy way to diagnose this is to look down, or even remove, the tip and see how the refill aligns. Another way is to remove the mechanism and move the refill forward and back by hand, checking for places where the refill rubs against the coupler. When diagnosing it is important to rule out wedging caused by a retaining pen spring assembled backward. The right picture shows the spring in the correct orientation.
Symptom 2: Refill not extending
A further example of misalignment can be seen in the next picture. This pen is so out of alignment that the refill cannot exit the tip.
Note that the back end is in line with the straight edge while the front end deviates greatly
All three of the above pens were repaired and able to function by disassembling and carefully re-assembling. This is not ideal because none of them will be perfect because of the gaps. The best case would be to re-trim the ends. This risks the refill being unable to retract fully from being shortened, however once it has gotten to this point, it is the only full solution.
Symptom 3: Click Failure
A standard, two-barreled click pen needs a certain length of tube to house the mechanism. Too long and the mechanism slides in the tube; too short and the mechanism is compressed. A compressed mechanism may crack, making it impossible for the refill to remain extended, or it can deform causing the mechanism to be sluggish, stiff, or not function at all.
Once this has happened the solution is to disassemble. If the barrel is too long, it can be trimmed down. Which is easy since the proper length should be the tube length. If the barrel is short, the only solution would be complete upper barrel disassembly. Line up the internal parts and mark on the plunger guide any excess length. The plunger guide length then must be ground down to make all the parts an exact fit. Obviously this is not a good situation.
Fundamentals of Barrel Trimming: How to avoid these issues
So, the question is how does one avoid these issues? First, we have to understand what barrel trimming is and what it does. What is referred to here as barrel trimming (also called end milling) does two important things. First, it cuts the ends of the barrel so that they are perpendicular to the tube. Second, it trims the excess wood so that the finished barrel is the proper length. Incorrect methods can affect either of these.
There are several methods to trim the barrel. Primarily, a barrel trimmer is used. The barrel trimmer consists of a spot facer with 2 or 4 blades and a pilot shaft of appropriate diameter for the tube. The trimmer is put in a drilling device and the pilot is inserted into the tube. This method is very reliable if done properly, which will be addressed shortly.
Another common method is to use a sanding disk. This method is effective and addresses the issue of delicate blanks that can be torn apart by trimmer blades. A third, but uncommon method is to use a saw to cut off the excess material. These last two methods require a jig to align the piece.
Fix 1: Proper Alignment
The first thing to address is alignment with the tube. If the tube and the ends of the barrel are not aligned, there will be problems as demonstrated in the first section of this guide. It is important to understand why relying on the tube is the only way to guarantee alignment.
The most common reason for improper trimming is to use the edges of the blank to guide the trimming alignment. Many people have used this method and on some pens they will be successful in function, although the appearance may look odd with gaps or bent appearance.
When a pen blank is drilled, the perfect hole will be centered; it will be exactly the right diameter to accommodate the tube and glue—no more, no less; and it will be completely parallel to the outside edges of the blank. In other words, the perfect hole is not going to happen very often.
Even if the hole is straight, there will be some wiggle room between the hole and tube for gluing purposes. When glued, the tube will not be centered in the hole. Even if the tube aligns with one side of a blank, it can still be off on another side. It is obvious that the blank can not be an alignment guide. The best penmakers understand that it is the tube that must be aligned to, not the blank.
This is the reason why the barrel trimmer has a pilot shaft. The shaft will align the trimming blades so that they are perpendicular to the tube. This will make it so that the when finished, the ends of the barrel will be straight across the end of the tube. In order to accomplish this alignment with sanding or sawing, a jig must be used that will align the tube perpendicular to the saw or disk. Ideally the jig will have sleeves that will act like the pilot shafts on a barrel trimmer.
The second common mistake is to have the trimmer and the blank both held in fixed devices, such as using a drill press with a vice when trimming. This can destroy the blank and the tube, it can interfere with the fit of the pen parts, and it can cause misalignment.
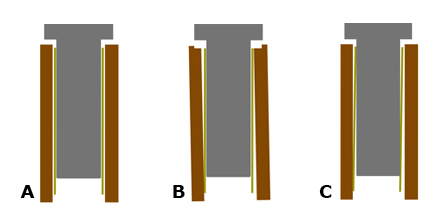
A: The impossible ideal: barrel, hole, tube, and shaft lined up perfectly. This will never happen in the real world.
B: This is closer to actual trimming. Barrel and tube are not aligned. The trimmer is aligned to tube and cuts a surface straight across the tube
C: In this picture the barrel and trimmer are aligned, but the tube is not lined up to either. The shaft will rub into the tube wall and ruin it. Even if the tube is slightly damaged, at best, the barrel ends will be slanted on the pen, causing uneven gaps.
Once again, the tube must be what guides the alignment. If the barrel is held in a vice, and the trimmer is in a drill press, the alignment will be determined by the blank in relation to the vice, platform, and press. In the best setup, either the trimmer or the blank must be loose. It must be held safely, but it must be allowed to move so that the tube aligns with the trimmer shaft. The same thing applies to other trimming methods. Whatever lines up the tube can be fixed, but the barrel must be loose. If one prefers to have the blank in a vice, then the trimmer should be in a hand held tool, such as a portable drill.
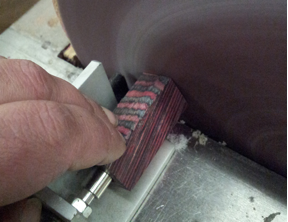
You also want to prevent the barrel from spinning, but still allow it to align with the trimming surface. Using a drill press, this can be accomplished with pliers or any handheld gripping device. A handy tip to consider here is that if the barrel is held too firmly immobile, a dig-in can tear out sections of the weakest link, namely the blank.
Holding the barrel loosely – just tight enough to prevent it from turning but loose enough for it to move if the trimmer digs in – will help prevent blowouts. A helpful tool for this is a ratcheting clamp with hinged feet, like the one pictured to the left. It will hold the piece but not so tightly that the blank can’t spin away if necessary.

Fix 2: Trimming Sleeves
Trimming sleeves have a very simple function. The reason for sleeves instead of shafts is a bit of history. For a long time, pen kits had just a few tube sizes. There were 7mm, 8mm, 3/8”, and 10mm tubes. Barrel Trimmer pilot shafts were created in order to fit the inside diameter of these tubes, we will call these sizes the core shafts and they make up most of the tube sizes that come with kits. Eventually there was the addition of the 8mm pencil tube; the inside diameter of which was slightly bigger than a 7mm trimming shaft but too small for the 8mm shaft. The solution was a barrel trimming sleeve that would fit over the 7mm shaft and act as an adapter and make up the difference.
Barrel trimming sleeves all work on the same principle. The sleeve is slid over one of the core shafts (usually 7mm) and then the entire assembly is put into the barrel and is used the same way as a standard barrel trimmer (see picture below). One thing to keep in mind is the length of the trimming sleeve compared to the tube. You may have to drill a hole to accommodate any extra sleeve length. Also, the interior of the tube must be cleaned manually before using the sleeve; there is no scraper on the sleeve so the interior of the tube is not automatically cleaned as it is with the trimmer pilot shafts. With the growing popularity of using sanding disks to trim, PSI has now made sleeves available to accommodate 8mm, 10mm, and 3/8” tubes on the sanding jig shaft.
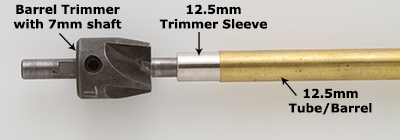
Anatomy of using the barrel trimmer with sleeve
When using the sanding disk, the ideal jig will hold a rod that points perfectly straight into the face of the disk. PSI sells such a jig #PKSQUARE. It has a base rod that is suitable for 7mm tubes, and trimming sleeves #PKTRIMSET can be purchased to adapt to other tube sizes.
Using sanding disk jig with sleeve
Fix 3: Match the barrel length to the length of the tube
The second purpose of trimming is to match the barrel length to the length of the tube. Since we want to combine the alignment aspect with the length aspect of trimming, we cut the blank to a length longer than the tube and cut it back when trimming. When this is done, care must be taken to keep the length matching the tube. Pen kits are designed to operate as if the turned material is not there. Meaning the optimal function can be observed by simply pressing the kit together straight out of the package.
A huge problem can be created in many kits by overtrimming. This happens when a bit of zealousness with the trimmer shaves of a bit off the brass tube. This can occasionally happen to even the best penmaker, but it should not happen on every pen, every trim. Some pen makers will talk of trimming until they see the brass turn shiny – a technique referred to as “kissing the brass”. It can be an easy way to see when to stop trimming without having to back off and check, but what happens is that it can get out of hand, and then it’s no longer a peck on the cheek!
There is no way to measure how much of the brass tube will be removed when you notice the brass start to “shine”. It could be very little, or it could be 1/8”. For some styles, a shortened tube can be adapted to, but others are harder to change. While there is some tolerance in the pen lengths and refill travel, for the most part, the kits are designed to have the refill extend and retract in an approximate range.
If the brass gets accidentally hit while carefully trying to get as close as possible, very little is removed. When the intention is to stop once the trimmer starts cutting into the brass, there is a good chance that a good deal of metal will be removed. If you calculate just trimming 1/64” off of each end what happens is that the tube is shortened by 1/32”.
This doesn’t seem like a lot, but that should be put in perspective. The pen tip usually sticks out around 3/32” and retracts about 3/64” inside the tip, so the travel is about 9/64”. Now if the kit travels just a little less, say 1/64”, then that little bit of overtrimming could make it so that the refill never fully retracts. If the overtrim is more than 1/32”, the pen is guaranteed not to retract fully. How do you check if you shaved off 1/32” or just barely touched it? You really can’t tell until after it goes to the lathe, and you can’t put the material back once you discover it’s too short. There is a solution to an overtrimmed pen, and that is to switch refill styles. If the barrel has been overtrimmed by 1/8”, and the pen normally takes a Parker style, switching to a Schaeffer Ballpoint Stlye “K” will provide you with a refill that is 1/8” shorter and will still work in most Parker style pen kits. Schaeffer is a brand name refill and there is no generic version, so it will cost more to solve the problem in this way.
The best way is to avoid the problem entirely. When trimming, constantly check how close you are to the tube. The closer you get to the tube, the more frequently you should check and the less time you should spend actually applying the trimmer. Always clear off any debris that interferes with your ability to see where the tube is in relation to the end—never assume you have some room to spare. You should also never trim with aggressive pressure because that will increase the chances of hitting the tube or tearing up the blank. By the time you are finished, you should be practically bouncing the trimmer down and back up. If you accidentally hit the tube at this point, don’t panic. An accidental hit will be minor compared to intentionally trying to hit the brass.
The lower barrel of the pen pictured above was overtrimmed by 3/64"
Fix 4: Properly clean and de-burr
The final process that will be covered here is preparing the tube for turning and pressing. Cleaning can be done with a trimmer pilot shaft of appropriate size. Bear in mind that the trimmer shafts are not a perfect fit in the tubes, there is a bit of clearance to allow the shaft to move freely. Because of this, it is possible to have some glue remaining in the tube after trimming. This can lead to problems later on. You don’t always need to do anything further to clean the tube, but if you look and see that there appears to be something remaining in the tube especially near the ends, clean it out with sandpaper. Again, do not be aggressive or you will widen the tube. If there is a significant amount of glue left in the tube, use a smaller tube, or even a threaded rod that will fit inside the tube to help clean it out.
Another good step is deburring or chamfering. This clears out any obstruction in opening of the tube caused by cutting tubes or accidentally trimming the brass. Burrs can interfere with pressing pen parts and even mounting the tubes on the bushings. De-burring is also helpful in widening the tube entrance for easier starting when you press in the parts.
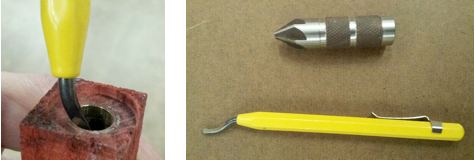
There are two tool styles recommended for this, which are pictured. One is the counter-sink style #BGCAM (top) and the other is the revolving style #MSDEBURR(bottom). The triangle style included with pipe cutters is actually not recommended here because those tend not to cut and the goal is to actually trim a bit of the metal.
Using the countersink style is rather simple. Just insert into the tube and twirl. This will cut a taper in the end of the tube and also cut any burrs away. The revolving style is used by inserting the tip of the cutter into the tube and performing a quick stirring motion. The swiveling blade will align itself to the motion and cut away any burrs in the metal. Both of these styles are available from various tool companies. The ones pictured are sold by PennState Industries.
Remember that being careful in preparing the tube and blank is quite possibly the most important thing to keep in mind when penmaking. The most beautiful pen body will not make a difference if the pen does not function. A lopsided gap will ruin the best work. So always make sure to spend as much attention to trimming as you would in turning. It will save a lot of frustration and time later on.