Cast Your Own Pen Blanks to Make Beautiful Resin Pens
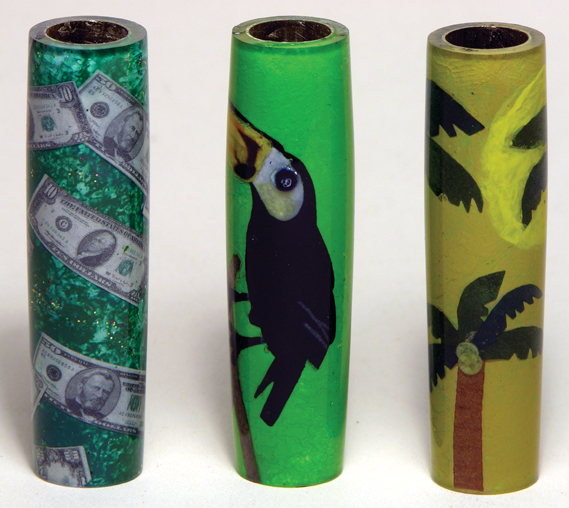
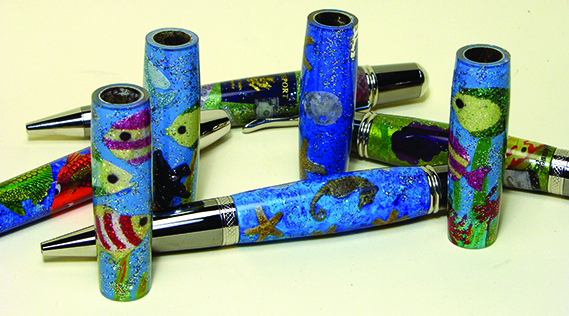 Use our versitile Cast-a-kit for making your own unique, customized pen blanks. By Barry Gross – “Mr. Solid Surface” Let Your Imagination Run Wild Get creative! Any number of different items can be glued onto a pen tube and then cast and turned into a pen. Here’s a short list of the possibilities: Snakeskin, wrapping paper, abalone shell pieces (used in this article), pigmy sea horses, tiny starfish, scrap book pieces, small Swarovski crystals, pictures, stamps, paintings, textures, glitter, doll house wallpaper and more. You can place anything on the pen tube and cast it with extraordinary results. |
 |
| Getting Started The poyester resins in the casting kit produce a strong odor, so wear some sort of respirator or dust mask, work in a highly ventilated area - the material is flammable so care such be taken when working with these chemicals. This article will not go into depth on turning the pen blank after it is made but rather on how to prepare the pen blank for turning and then polishing the acrylic coating to a lustrous shine! I will break this down into two sections, first section prepares the pen blank and for this example I paint the background of a pen tube and prepare it for gluing abalone shell pieces to it The second section shows turning and finishing the pen blank. So get some pen tubes and let’s get creative! Paint the pen blank Rough up the pen tubes to accept a coating of paint. (Photo 1) Coat the scratched pen tubes with a multi purpose sealer so the paint will adhere to the pen tubes using an Aqualon Glaze Wash ¾” brush. You’ll want to hide the brass tube behind the abalone shells so coat the pen tubes with black paint using a ¼” brush. This is done so if you have any gaps in between the abalone pieces it will not be noticeable. To enhance the background paint the black coated tube with some Deco Art Twinkle glitter paint using an Aqualon Shader 3/8”brush. If gaps are visible the glitter paint and black background will disguise any flaws when you are gluing on the abalone pieces. 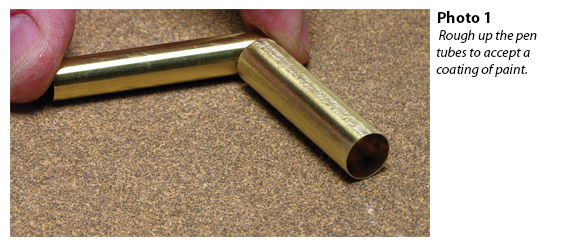
Get on the abalone pieces Start to glue the thin abalone pieces to the painted tube one piece at a time using medium ca glue. (Photo 2) Make sure that you use the thinnest, flattest pieces of shell you can find. If you use thicker material, when you coat the pen tube with the coating it will stick out through the acrylic. Continue placing the shell pieces until you’ve completely coated the pen tubes. 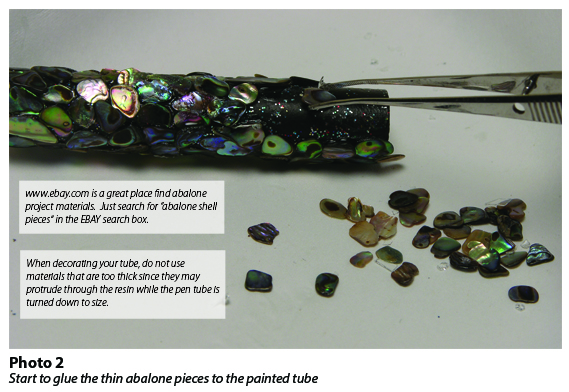 |
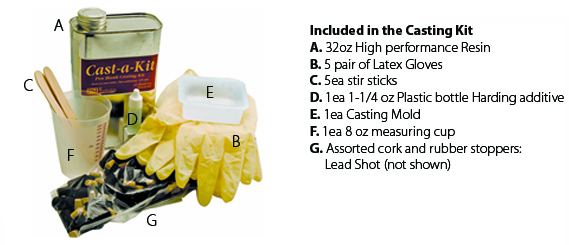
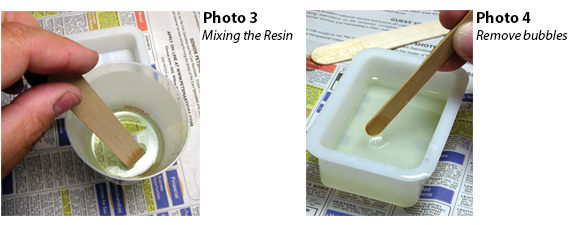
| Cast the tubes Open the pen blank casting kit to inspect all the components. Follow the manufacturers’ suggestions on how much resin to pour into the mold the first time. For our casting kit this particular mold it is suggested to pour 2 ounces of resin into the measuring container. Add the appropriate number of drops of hardener and stir very slowly and carefully not to create any air bubbles. (Photo 3) The addition of the hardener causes the resin to heat up – SO DO NOT ADD ANY EXTRA hardener to the mixture – follow the instructions carefully! The first layer of resin is going to be a base that we rest the tubes onto. Carefully and slowly pour the mixture into the mold. If you pour too quickly it in you might create some bubbles. If you do you can remove them with a craft stick as shown. (Photo 4). |
 |
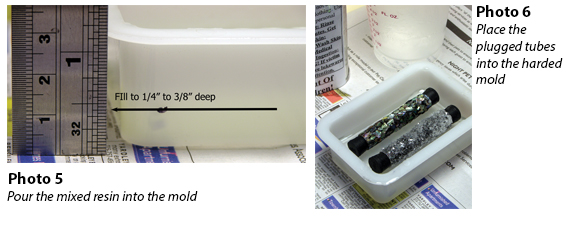
| Pour the mixed resin into the mold to a depth of approximately 1/4” to 3/8” deep. (Photo 5). Allow this to harden overnight. In warmer weather it will harden sooner. The hardened resin should be hard to the touch. When casting, we don’t want resin creeping into the tubes so we plug and weight them so they wont float in the resin. Select the appropriate plug size, plug one end of the tube, pour lead shot into the tube then plug the other end. Place the plugged tubes into the mold on top of the 3/8” layer of hardened acrylic from the previous step. (Photo 6). |
Let your imagination run wild! |
 |
|
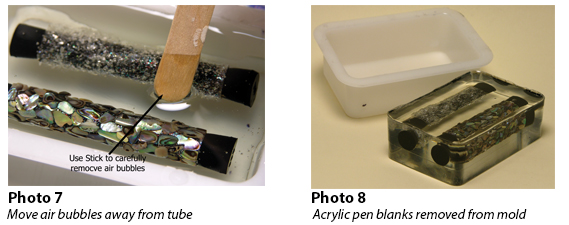
Mix up three ounces of resin and carefully pour the resin into the mold over the tubes. Move the pen tubes slightly to remove any air bubbles that might be trapped under the pen tube. Allow the bubbles to come to the surface. Remove the air bubbles using a craft stick as before. If you can not completely remove all the air bubbles at least get them off to the side as shown. (Photo 7) Wait at least 24 hours and after the mold is completely cured. Twist the ends of the mold to release the casting, then remove the casting from the mold. (Photo 8) |
 |
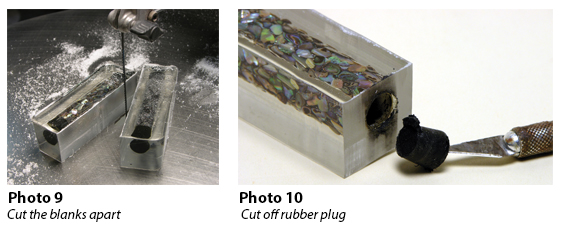
Use a scroll saw or a band saw to cut the blanks apart. (Photo 9) Use a scroll saw or a band saw and carefully cut the rubber plugs from the ends of the mold. Use a hobby knife to remove the cut off rubber plug and the weights inside the blank. (Photo 10) |
 |
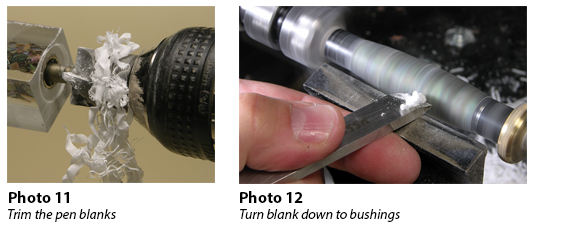
Turn the blanks CAREFULLY trim the edges of the pen blank with a barrel trimmer. (Photo 11). If you apply too much pressure you will crack the end of the pen barrel. Mount blanks on the lathe and start to turn using a roughing gouge. The key to successfully turning any acrylic is to take “very small, light bites & use very sharp tools!” Use a sharp skew chisel but use it as a scraper as shown to get a light wisps of acrylic off the skew as shown. (Photo 12) |
 |
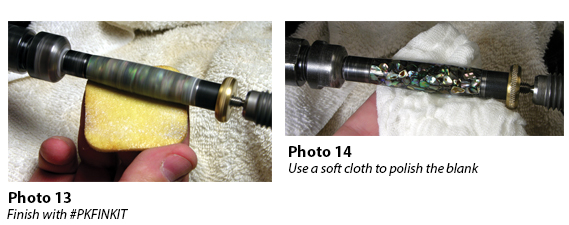
Reduce the blank down even to the bushing using your skew as a scraper. Sand with 220 grit until the pen blank is smooth. Do not worry about the scratches use only one grit of sandpaper to smooth the pen blank. Use the acrylic finishing kit #PKFINKIT through 12,000 grit (Photo 13) then polish #ONESTEP as per the manufacturer’s instructions to get a mirror finish on the acrylic surface. Use a soft cloth to polish the pen blank as it is turning on the lathe to a mirror scratch free shine! The acrylic magnifies the abalone shell and really makes it stand out! (Photo 14). Finally, assemble your pen to make an extraordinary writing instrument. |
 |
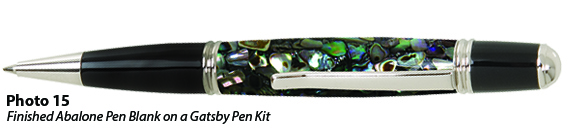 |
Additional Tips • If your project uses small tubes or a single tubes, place a plastic spacer in the mold to reduce the amount of resin you will consume. A good spacer is plastic that has been cut off from previous projects. • Use CA glue to fill in any voids or “blowouts” during the turning process. • Don’t decorate your tubes with materials that are too thick or it may protrude though your finished turning. • Use water to test for the amount of resin you will need prior to mixing the resin - this will help you maximize your resin. • Color your resin with one of various products specially formulated to mix with and color resin. Tools Needed: • Barrel Trimmer: #PKTRIM7 • Lathe with assorted turning tools • Scroll Saw or Band Saw and color resin Supplies • Casting Kit: #PKCASTKIT • Finishing Kit: #PKFINKIT • Polishing: #ONESTEP • Pen Kit tube shown: #PKGAPEN (GATSBY) • Abalone Shell: Avaliable on the web |