Pack of 4 Aluminum Honeycomb 3/4in. X 3/4in. X 5in. Pen Blanks

Thumbnail Filmstrip of Pack of 4 Aluminum Honeycomb 3/4in. X 3/4in. X 5in. Pen Blanks Images
Description
Save with this 4 pack! You get on Aluminum Honeycomb Pen Blank in Black, one in red, one in blue and one in white. Acrylic resins combined with an intricate aluminum honeycomb structure will give you pen project an extraordinary look. The blank drills and turns easily with light cuts using either sharp High-Speed Steel or Carbide turning tools. Finish like any acrylic blank with Micromesh and polish for a beautiful finish. Will perfectly complement our Honeycomb Twist Pen.
Rick R.
Verified Buyer
5.0 star rating
01/06/23
Aluminum Honeycomb Blanks
Review by Rick R. on 6 Jan 2023 review stating Aluminum Honeycomb Blanks
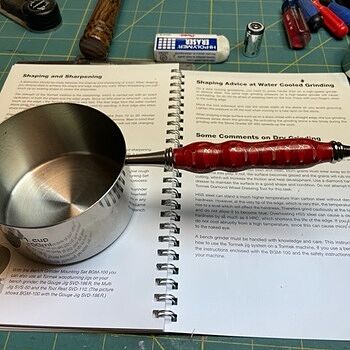
These blanks turned nicely first using a square tip Carbide Magic Pen Genie bit to round the blank followed by a round tip Carbide Magic Cove Master bit to get the profile I wanted and then finished easily using Micro Mesh Sanding Pads. These blanks provided very unique handles on a set of measuring cups.
On Pack of 4 Aluminum Honeycomb 3/4in. X 3/4in. X 5in. Pen Blanks
Rick R.
Verified Buyer
5.0 star rating
01/06/23
Aluminum Honeycomb Blanks
Review by Rick R. on 6 Jan 2023 review stating Aluminum Honeycomb Blanks
These blanks turned nicely first using a square tip Carbide Magic Pen Genie bit to round the blank followed by a round tip Carbide Magic Cove Master bit to get the profile I wanted and then finished easily using Micro Mesh Sanding Pads. These blanks provided very unique handles on a set of measuring cups.
On Pack of 4 Aluminum Honeycomb 3/4in. X 3/4in. X 5in. Pen Blanks
Bret L.
Verified Buyer
4.0 star rating
09/11/22
Looks great
Review by Bret L. on 11 Sep 2022 review stating Looks great
A little tricky to turn. Negative rake Carbide made huge difference. Go slow.
On Pack of 4 Aluminum Honeycomb 3/4in. X 3/4in. X 5in. Pen Blanks
Bob G.
Verified Buyer
3.0 star rating
02/16/22
Slow and Easy
Review by Bob G. on 16 Feb 2022 review stating Slow and Easy
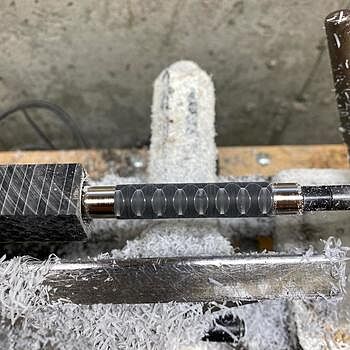
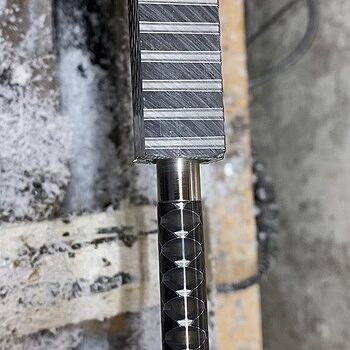
I read several reviews of this blank before I purchased one. Many said they are tricky, and a few said they were terrible to work with. Lots of tear out and blowout, sharp edged etc. I think to avoid complaints about bad outcome, perhaps PSI should include some tips for successfully turning this blank in each package. I included four photos so you can see progress along the way. You will notice in the first photo that there is a small tear out in the middle. The chipping on the ends is only on the slight overhang after squaring. These issues were turned out as I went along.
The best advice for this blank is making sure your tools are freshly sharpened to the proper angle. A dull tool will destroy this blank in a hurry. I used a bowl gouge and finished up with a small round nose scraper.
My lathe does not have a digital readout so I can't give specific RPM. I elected to drill at a slightly higher speed than I normally use. My theory being I wanted to cut through the metal cleanly without catches. To compensate for the increased RPM, I used very gentle and slow pressure when advancing the bit. I backed out the drill every 1/4 to 1/2 inch and cleared the debris. Take your time and you will have a clean hole with no issues.
I also elected to turn at a slightly higher RPM for the same reason. Along with sharp tools, you need a very soft touch. If you try to take a normal size bead and run it off the end of the blank like you may do with wood, you will likely blow it out. I usually use a skew toward the end to smooth out the peaks and valleys, but I opted for the small scraper on this. I think it was a good choice but again, slow and gentle.
I dry sanded to 600 grit and wet sanded to 12,000 grit. I finished with a few coats of plastic polish at a higher RPM.
I had some concern about the ends at the bushings. Normally I make sure the blank is exactly flush to the bushing and I'm unable to feel the transition point. I decided to go slightly lower with this blank to be sure the metal "end grain" was just slightly lower than the bushing. By "slightly lower" I mean so I could just feel the transition, but it would be unnoticeable to the eye. The end result is beautiful. My project called for straight barrels but projects with a tapered barrel would be really nice with progressive pattern change.
My last bit of advice is that if you are new to pen turning, this blank is probably not something you want to try right away. Get a feel for turning both wood and acrylic pens first.
On Pack of 4 Aluminum Honeycomb 3/4in. X 3/4in. X 5in. Pen Blanks
Bob G.
Verified Buyer
3.0 star rating
02/16/22
Slow and Easy
Review by Bob G. on 16 Feb 2022 review stating Slow and Easy
I read several reviews of this blank before I purchased one. Many said they are tricky, and a few said they were terrible to work with. Lots of tear out and blowout, sharp edged etc. I think to avoid complaints about bad outcome, perhaps PSI should include some tips for successfully turning this blank in each package. I included four photos so you can see progress along the way. You will notice in the first photo that there is a small tear out in the middle. The chipping on the ends is only on the slight overhang after squaring. These issues were turned out as I went along.
The best advice for this blank is making sure your tools are freshly sharpened to the proper angle. A dull tool will destroy this blank in a hurry. I used a bowl gouge and finished up with a small round nose scraper.
My lathe does not have a digital readout so I can't give specific RPM. I elected to drill at a slightly higher speed than I normally use. My theory being I wanted to cut through the metal cleanly without catches. To compensate for the increased RPM, I used very gentle and slow pressure when advancing the bit. I backed out the drill every 1/4 to 1/2 inch and cleared the debris. Take your time and you will have a clean hole with no issues.
I also elected to turn at a slightly higher RPM for the same reason. Along with sharp tools, you need a very soft touch. If you try to take a normal size bead and run it off the end of the blank like you may do with wood, you will likely blow it out. I usually use a skew toward the end to smooth out the peaks and valleys, but I opted for the small scraper on this. I think it was a good choice but again, slow and gentle.
I dry sanded to 600 grit and wet sanded to 12,000 grit. I finished with a few coats of plastic polish at a higher RPM.
I had some concern about the ends at the bushings. Normally I make sure the blank is exactly flush to the bushing and I'm unable to feel the transition point. I decided to go slightly lower with this blank to be sure the metal "end grain" was just slightly lower than the bushing. By "slightly lower" I mean so I could just feel the transition, but it would be unnoticeable to the eye. The end result is beautiful. My project called for straight barrels but projects with a tapered barrel would be really nice with progressive pattern change.
My last bit of advice is that if you are new to pen turning, this blank is probably not something you want to try right away. Get a feel for turning both wood and acrylic pens first.
The best advice for this blank is making sure your tools are freshly sharpened to the proper angle. A dull tool will destroy this blank in a hurry. I used a bowl gouge and finished up with a small round nose scraper.
My lathe does not have a digital readout so I can't give specific RPM. I elected to drill at a slightly higher speed than I normally use. My theory being I wanted to cut through the metal cleanly without catches. To compensate for the increased RPM, I used very gentle and slow pressure when advancing the bit. I backed out the drill every 1/4 to 1/2 inch and cleared the debris. Take your time and you will have a clean hole with no issues.
I also elected to turn at a slightly higher RPM for the same reason. Along with sharp tools, you need a very soft touch. If you try to take a normal size bead and run it off the end of the blank like you may do with wood, you will likely blow it out. I usually use a skew toward the end to smooth out the peaks and valleys, but I opted for the small scraper on this. I think it was a good choice but again, slow and gentle.
I dry sanded to 600 grit and wet sanded to 12,000 grit. I finished with a few coats of plastic polish at a higher RPM.
I had some concern about the ends at the bushings. Normally I make sure the blank is exactly flush to the bushing and I'm unable to feel the transition point. I decided to go slightly lower with this blank to be sure the metal "end grain" was just slightly lower than the bushing. By "slightly lower" I mean so I could just feel the transition, but it would be unnoticeable to the eye. The end result is beautiful. My project called for straight barrels but projects with a tapered barrel would be really nice with progressive pattern change.
My last bit of advice is that if you are new to pen turning, this blank is probably not something you want to try right away. Get a feel for turning both wood and acrylic pens first.
On Pack of 4 Aluminum Honeycomb 3/4in. X 3/4in. X 5in. Pen Blanks
David C.
Verified Buyer
5.0 star rating
01/14/22
Great product
Review by David C. on 14 Jan 2022 review stating Great product
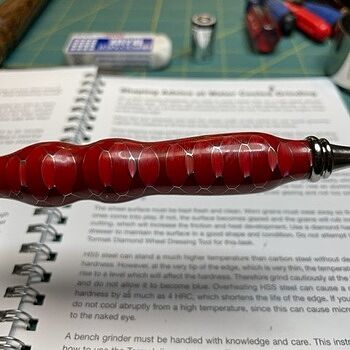
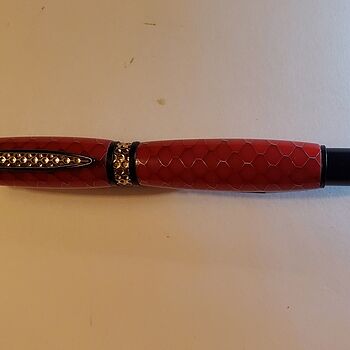
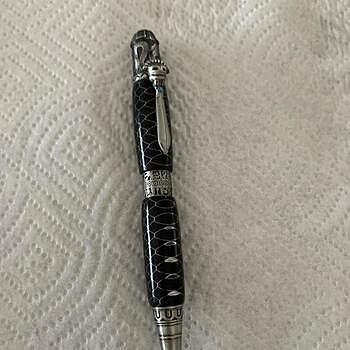
This is a great product, I used the acrylic drill bit I kept the drill bit cool by drilling low rpm and wet a paper towel backed out several times to cool the drill bit with the wet towel.
I turned it at 1800 rpm using a carbide negative rake.
polished ant 1800 rpm using the polishing pads with water.
This is the method I use on all acrylic pens I make.
I attached a picture, need better lighting, it is a beautiful pen.
I turned it at 1800 rpm using a carbide negative rake.
polished ant 1800 rpm using the polishing pads with water.
This is the method I use on all acrylic pens I make.
I attached a picture, need better lighting, it is a beautiful pen.
On Pack of 4 Aluminum Honeycomb 3/4in. X 3/4in. X 5in. Pen Blanks
Joe R.
Verified Buyer
4.0 star rating
09/14/21
Slow down it's not wood
Review by Joe R. on 14 Sep 2021 review stating Slow down it's not wood
Overall a good product. You have to go slow. I initially had trouble but did not quit on it. It makes a beautiful pen but be prepared for some creative fixes.
On Pack of 4 Aluminum Honeycomb 3/4in. X 3/4in. X 5in. Pen Blanks
Slideshow
Slide controls


Specifications
| Specification | Description |
|---|---|
| Finish: | Various |
| Blank Size: | 3/4 x 3/4 x 5 |
| Material Type: | Acrylic |
| Pre-Drilled: | No |
| Pieces in Set: | 4 |
| Category: | Pen Blanks |

