here2

Articles


Avoid the burn, trim slowly

When trimming the ends of a blank with the barrel adhered inside, use minimal pressure and raise and lower the barrel trimmer frequently to prevent the trimmer from burning the end of the blank and darkening or discoloring the wood. Hard, resinous woods, like those of the rosewood family, tend to burn easily if you trim too quickly. Trim for a second or less and back the trimmer out of the hole to check the depth of cut. Don’t drill too deeply and cut into the brass. To avoid injury never hand hold the blanks when trimming and keep the speed below 500 rpm. If you’re having a difficult time viewing the brass barrel in the hole, a magnifying glass works wonders.

Check out some of the tools and supplies in the article with the links below...
Pen Blank Trimming & Cutting
Stabilized Wood Pen Blanks
Hardwood Pen Blanks
Pen Blank Drilling Center Vise

Crosscutting Barrels

When a micro-thin crosscut is critical
When using finely grained woods, getting a perfect grain match between the upper and lower barrels can make the difference between an average pen and a professional-looking project. Minimizing stock loss when crosscutting is essential to keeping the grain aligned. To minimize wood loss when crosscutting stock, a thin cut is the solution. You can crosscut stock on the bandsaw using a blade with minimal set angle. You can also cut them by hand using a fine-toothed saw like the razor saw with a miter box as shown. To make this setup even easier to use, attach a 3x12” piece of ½” plywood to the aluminum miter box enabling it to be securely clamped to a workbench top. The ½” hole in the base allows it to be hung for ease of storage. After cutting, mark the matching ends of the blanks so you will turn and assemble the kit with continuous grain.

Make Wooden Handles

It’s fun using your lathe but not fun grabbing those skinny metal bar handles on the Toolrest and Tailstock Banjo that dig into your hand.

Here’s a project that serves 3 purposes:
1) Makes using the lathe handles easier and less stressful
2) Provides a fun turning project
3) Makes your lathe look awesome!

TAIL STOCK HANDLE: Cut a blank 2” square x 2-1/2” long. Drill a 19/32” hole to 1-3/4” deep. Turn the blank between centers to a profile that fits your palm. Part the wood for a 2” long handle cover. BANJO HANDLE: Cut a handle, 1-1/2” square x 5-1/2” long. Drill a 12.5mm hole to 4” deep. Turn the blank between centers to a profile that fits your palm. Part the wood for a 4-1/2” long handle cover.
TIP: If the drill bits required are not available or the hole in the wood is too large, use the next larger bit and wrap a strip of masking tape over the metal to fill up the space for a snug fit.

Marketing Your Work

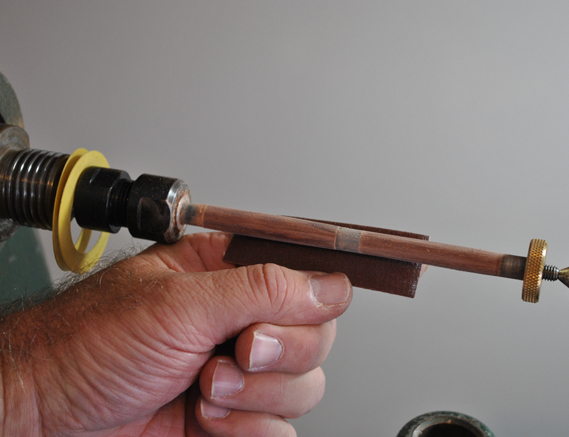
How do you get started in selling your pens? The first step is to carry your OWN pen! This may sound silly but I cannot tell you how many pen turners do not advertise their own work by showing off a pen they have made! How do you expect to sell something if you do not have an example of your craftsmanship? Whenever I sign anything or write anything down I always use a pen that I made. By me using my own pen, will lead to a person to ask about the pen I am using and if they don’t ask, I make sure that I show it to them and tell them about it. Be proud of your creations – show your work to anyone and everyone and make sure they know that you made that pen. Hand someone your business card – always have them available to hand out!

The internet and bookstores are loaded with books and articles on how to market and sell your creations. This very brief introduction is by no means going to give you all the answers to success.
marketing your work
Finding a market for your work…

Being a sales manager with over 30 years experience training sales representatives on how to “sell,” the first objective for any good sales representative is to listen. We have two ears and one mouth so why do we talk twice as much as we listen? Listen to what your customer is telling you. Every market is different, what sells in New England may not sell well in Texas and conversely what sells in California may not sell in Minnesota! So, take a moment and conduct your own market research. Visit local galleries, attend craft fairs and join a local woodturning club for ideas on what may sell in a particular area.

Getting Established - A fast way to establish yourself is to offer your work for local fundraising. The local ambulance squad was having a fundraiser and I offered to split the proceeds of the sales of my pens as a donation to the ambulance squad. This accomplished three things. First, it was good to give to the ambulance squad. Second, it established my work in the area and exposed me to many people. And third, as a result, many other orders were taken for special pens to be delivered at a later time.

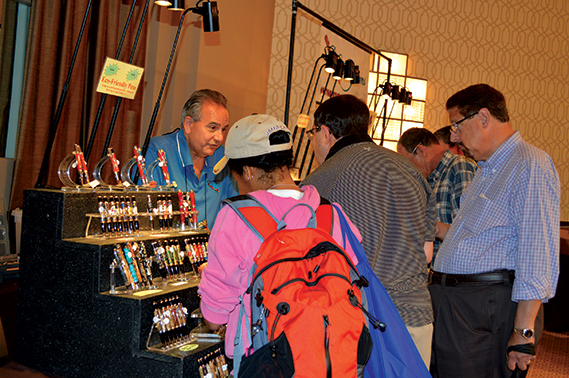
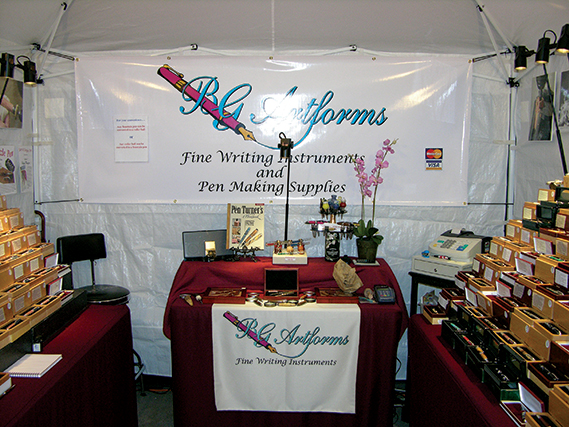
Selling at festivals and shows-how do I find out about them? The fastest and easiest way is to search the internet for Craft Fairs and you will see thousands of shows all over the country. There are publications like Craft Master News devoted to art & craft shows so look them up on the internet and find out which ones are local to you. Do you want to do juried art and craft shows (where you send in images of your work to be judged before you are selected) or do you try flea markets and local craft shows that charge a minimal fee for a table. If you send in digital images of your work, make sure that they are crisp and clear and show detail in your work. You may have the nicest pens made, but if the images are of poor quality than chances are you will not get accepted. Whatever you choose just make sure that you check out the promoters of the venue and the area you will be displaying your work.
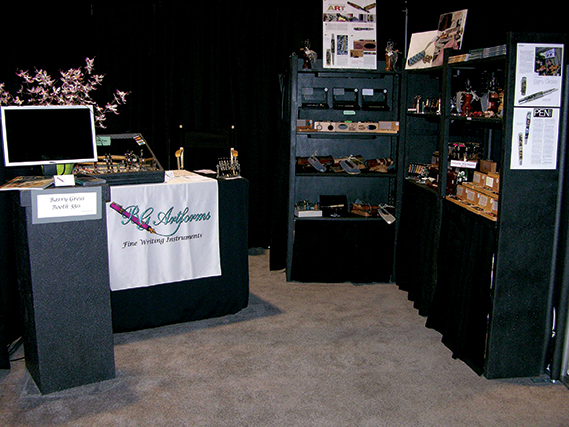
Displaying your work - 
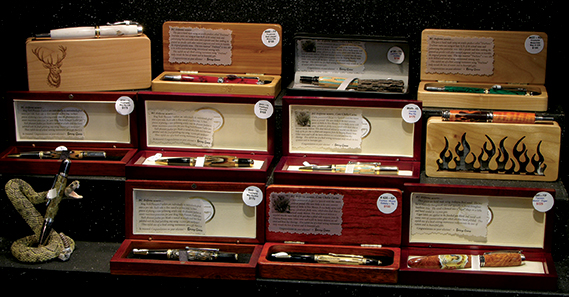
Lighting is critical! With outdoor shows the lighting is nature and perfect. However, if you are indoors, make sure that you use high intensity lighting and some sort of stair step display to get the pens off the table and elevated! The correct lighting makes your work “pop” with brilliance and is critical when potential customers are looking at your pens. Have a writing tablet with good quality ink available for people to try your pens. You would not purchase a car without driving it; so do not expect someone to purchase a pen if they do not first write with it. Finally, my motto and it is in written in my books and there is a sign in my booth at my fine art and craft shows stating “life is too short to own an ugly pen!” This simply statement gets a reaction from everyone who reads it. Once they read it that will start a conversation and you can engage your potential customer and show them your favorite pen that is in your pocket!
display
display
display

Sand this way and that

All pen barrels have to be sanded smooth, but how you do that sanding can make a big difference in the final result. To guarantee a smooth surface every time, start with the finest possible grit. If you've turned a surface that feels smooth to the touch, start with 150 or 240 grit sandpaper. Then, with the lathe spinning at a slower speed, (1,000 to 1,250 rpm), sand across the grain. Stop the lathe and use the same grit to sand with the grain from one end of the blank to the other. Sanding with the grain removes circular scratches. Continue the two-step sanding process with 320, 400, and 600 grit paper. Be careful not to sand the bushings.

Check out some of our top quality sanding solutions below.....
Abralon Sanding Pads
Micromesh Sheets
Sanding Rolls and Sheets

Cast Your Own Pen Blanks to Make Beautiful Resin Pens


marketing your work
Use our versitile Cast-a-kit for making your own unique, customized pen blanks. By Barry Gross – “Mr. Solid Surface”

Let Your Imagination Run Wild
Get creative! Any number of different items can be glued onto a pen tube and then cast and turned into a pen. Here’s a short list of the possibilities: Snakeskin, wrapping paper, abalone shell pieces (used in this article), pigmy sea horses, tiny starfish, scrap book pieces, small Swarovski crystals, pictures, stamps, paintings, textures, glitter, doll house wallpaper and more. You can place anything on the pen tube and cast it with extraordinary results.
marketing your work
Getting Started
The poyester resins in the casting kit produce a strong odor, so wear some sort of respirator or dust mask, work in a highly ventilated area - the material is flammable so care such be taken when working with these chemicals. This article will not go into depth on turning the pen blank after it is made but rather on how to prepare the pen blank for turning and then polishing the acrylic coating to a lustrous shine!

I will break this down into two sections, first section prepares the pen blank and for this example I paint the background of a pen tube and prepare it for gluing abalone shell pieces to it The second section shows turning and finishing the pen blank. So get some pen tubes and let’s get creative!

Paint the pen blank
Rough up the pen tubes to accept a coating of paint. (Photo 1) Coat the scratched pen tubes with a multi purpose sealer so the paint will adhere to the pen tubes using an Aqualon Glaze Wash ¾” brush. You’ll want to hide the brass tube behind the abalone shells so coat the pen tubes with black paint using a ¼” brush. This is done so if you have any gaps in between the abalone pieces it will not be noticeable. To enhance the background paint the black coated tube with some Deco Art Twinkle glitter paint using an Aqualon Shader 3/8”brush. If gaps are visible the glitter paint and black background will disguise any flaws when you are gluing on the abalone pieces.
marketing your work

Get on the abalone pieces
Start to glue the thin abalone pieces to the painted tube one piece at a time using medium ca glue. (Photo 2) Make sure that you use the thinnest, flattest pieces of shell you can find. If you use thicker material, when you coat the pen tube with the coating it will stick out through the acrylic. Continue placing the shell pieces until you’ve completely coated the pen tubes. marketing your work

Cast the tubes
Open the pen blank casting kit to inspect all the components. Follow the manufacturers’ suggestions on how much resin to pour into the mold the first time. For our casting kit this particular mold it is suggested to pour 2 ounces of resin into the measuring container.

Add the appropriate number of drops of hardener and stir very slowly and carefully not to create any air bubbles. (Photo 3) The addition of the hardener causes the resin to heat up – SO DO NOT ADD ANY EXTRA hardener to the mixture – follow the instructions carefully! The first layer of resin is going to be a base that we rest the tubes onto. Carefully and slowly pour the mixture into the mold. If you pour too quickly it in you might create some bubbles. If you do you can remove them with a craft stick as shown. (Photo 4).
display
Pour the mixed resin into the mold to a depth of approximately 1/4” to 3/8” deep. (Photo 5). Allow this to harden overnight. In warmer weather it will harden sooner. The hardened resin should be hard to the touch.

When casting, we don’t want resin creeping into the tubes so we plug and weight them so they wont float in the resin. Select the appropriate plug size, plug one end of the tube, pour lead shot into the tube then plug the other end. Place the plugged tubes into the mold on top of the 3/8” layer of hardened acrylic from the previous step. (Photo 6).
display

Let your imagination run wild!
display
Mix up three ounces of resin and carefully pour the resin into the mold over the tubes. Move the pen tubes slightly to remove any air bubbles that might be trapped under the pen tube. Allow the bubbles to come to the surface. Remove the air bubbles using a craft stick as before. If you can not completely remove all the air bubbles at least get them off to the side as shown. (Photo 7)
Wait at least 24 hours and after the mold is completely cured. Twist the ends of the mold to release the casting, then remove the casting from the mold. (Photo 8)
display


Use a scroll saw or a band saw to cut the blanks apart. (Photo 9) Use a scroll saw or a band saw and carefully cut the rubber plugs from the ends of the mold. Use a hobby knife to remove the cut off rubber plug and the weights inside the blank. (Photo 10)
display


Turn the blanks
CAREFULLY trim the edges of the pen blank with a barrel trimmer. (Photo 11). If you apply too much pressure you will crack the end of the pen barrel. Mount blanks on the lathe and start to turn using a roughing gouge. The key to successfully turning any acrylic is to take “very small, light bites & use very sharp tools!” Use a sharp skew chisel but use it as a scraper as shown to get a light wisps of acrylic off the skew as shown. (Photo 12)
display


Reduce the blank down even to the bushing using your skew as a scraper. Sand with 220 grit until the pen blank is smooth. Do not worry about the scratches use only one grit of sandpaper to smooth the pen blank. Use the acrylic finishing kit #PKFINKIT through 12,000 grit (Photo 13) then polish #ONESTEP as per the manufacturer’s instructions to get a mirror finish on the acrylic surface. Use a soft cloth to polish the pen blank as it is turning on the lathe to a mirror scratch free shine! The acrylic magnifies the abalone shell and really makes it stand out! (Photo 14).

Finally, assemble your pen to make an extraordinary writing instrument.
display
display


Additional Tips
• If your project uses small tubes or a single tubes, place a plastic spacer in the mold to reduce the amount of resin you will consume. A good spacer is plastic that has been cut off from previous projects.
• Use CA glue to fill in any voids or “blowouts” during the turning process.
• Don’t decorate your tubes with materials that are too thick or it may protrude though your finished turning.
• Use water to test for the amount of resin you will need prior to mixing the resin - this will help you maximize your resin.
• Color your resin with one of various products specially formulated to mix with and color resin.

Tools Needed:
• Barrel Trimmer: #PKTRIM7
• Lathe with assorted turning tools
• Scroll Saw or Band Saw and color resin

Supplies
• Casting Kit: #PKCASTKIT
• Finishing Kit: #PKFINKIT
• Polishing: #ONESTEP
• Pen Kit tube shown: #PKGAPEN (GATSBY)
• Abalone Shell: Avaliable on the web

How to avoid pen barrel blowouts

marketing your work
“How to avoid pen barrel blowouts” By Barry Gross

This happens to the best of us and if someone says that it never happens to them they are not telling you the truth! Blows out can come from a number of reasons but the two things I look at are how was the pen blank drilled and then how was the pen tube glued into the pen blank? Let’s first look at drilling the pen blank. I do not drill with a drill press. I drill on the lathe (Item #CSCPENCHK) – I believe you get a more accurate straight holes drilling on the lathe. If the hole is too loose, then the glue you use may not make good contact between the pen tube and the inside of the pen blank. If the glue is not making a bond and you get a catch then you might tear a piece of the blank off.
marketing your work marketing your work
The next culprit may be the pen tubes were not roughed up – I always rough up the pen tubes so the glue has a better surface to have the glue bond to it. The tube on the right is not roughed up while the tube on the left is roughed up and is ready to be glued into the pen blank.

marketing your work marketing your work
If the pen blank you are using is not stabilized, then drip some thin CA glue into the pen blank so it can be absorbed into the wood and this will allow for a better surface for the CA glue to bond with.

marketing your work

Next I will use some CA glue to glue the pen tubes into the pen blank. If you happen to get some glue on the inside of the tube, use an exacto knife to remove the excess glue.

If you follow these guidelines, it might help you have a few less “blow outs” with your turnings and having more success is a lot more fun than trying to pick up the pieces!

Indent That Center point

marketing your work
Indent that center point

Use a sharp pencil and small combination square to mark diagonals to mark the center point on one end of a pen blank. For dark woods, intersecting lines marked with a Sharpie can be easier to see than pencil lines. Clamp the marked blank and indent the marked center point with an awl or center punch. The indentation allows the point of the bit to self-center over the indentation when drilling the hole for the barrel.

Quit Guessing Grits

marketing your work
Quit Guessing Grits

Unlike sheet abrasives, abrasive strips don’t have the grits marked on the back side, making it easy to lose track of the grit being used, especially when you have several small strips at your work area. To solve this dilemma, use a felt-tipped marker to mark the grit on the blank back side of the abrasive strips for ease of reference. Immediately after cutting a piece of abrasive strip to length, mark the grit reference number on the back side. Use a small container to store strips in for use later.


Is it round yet

marketing your work
Is it round yet?

Starting and stopping a lathe to check that the blank is perfectly round not only wastes time, but is hard on the electronics when done hundreds of times. Here’s a time-saving solution to alleviate that problem. With the lathe running touch the top of the turned blank against the bottom surface of the turning tool where shown in the photo. If the tool edge rides on the blank without chatter, you know the blank is round. If the tool bounces up and down the least amount, you know you’ve still got a few cuts to make. With a little practice, you’ll be able to feel and hear if a blank is round without having to turn the lathe off to view the surface.

Barry Gross's Techniques for Making an Acrylic pen

Part 1 - Preparation:

In Part 1, Barry shows you tips & techniques for marking up and cutting the pen blank, drilling the blank, gluing up the blank & squaring the ends of the blank


Part 2 - Turning and Finishing:

In Part 2, Barry gives you tips to successfully turn & finish an acrylic pen including his anchor bevel cut technique.

How to make a bottle stopper

By: Marlen Kemmet

A good bottle of wine deserves an equally classy bottle stopper. And few of the stoppers available on store shelves look nearly as nice as one you can easily make yourself using a small chunk of wood, an inexpensive piece of hardware, and basic turning tools and skills.

1. Cut a piece of stock to 2x2" square by 2½" long for the stopper blank. Crosscut the ends for flat, parallel surfaces. Since you’ll be using such a small amount of stock, look for the most figured wood you can find.

2. Mark diagonals on both ends of the blank to find centers. Use an awl and mallet to make a small indentation at each centerpoint.

3. Set your drill press to 1,200 RPMS or slower, and using a small handscrew clamp like shown in
Photo 1, drill a 23/64" hole ¾" deep centered in one end of the stopper blank. Or, drill a 5/16" hole ¾" deep in the center of the blank, and use the Penn States bottle stopper drill and tap set to tap the hole in the blank as shown in Photo 2. If you hand-tap the hole, be careful to slowly drive the threading tool straight into the hole and not at an angle. Either method enables you to thread the blank onto the screw chuck shown in Step 3.

TIP: A piece of masking tape wrapped around your drill bit ¾" from the end of the bit provides a visual stop for drilling the correct depth hole as shown in Photo 1. I overlap the last 3/8" of the tape to create a “flag” that makes it easier to see when the tape contacts the blank.


Photo 1 – Drilling the hole in the bottle stopper blank


Photo 2 – Tapping the 5/16" hole in the stopper blank

4. Thread the appropriate-sized bottle stopper screw chuck onto your headstock spindle. Just as the threading on headstock spindles comes in different sizes, so do Penn States chucks.

5. Thread the bottle stopper blank onto the threaded end of the chuck, drawing the bottle stopper blank flush (no gap) with the face of the chuck.

6. Move your tailstock cone center into position to support the exposed end of the bottle stopper blank. Fit the end of the cone center into the indented hole in the blank.

7. Position your tool rest just a bit below the center of the mounted blank. Set the lathe to a speed of about 1,500 RPM and with a spindle roughing gouge turn the blank round as shown in Photo 3.


Photo 3 – Turning the blank round

8. At this point make sure you have a good idea of the stopper shape you want to end up with. Consider what will be comfortable in your hand when inserting and removing the stopper from a wine bottle. Find a photo of an existing stopper that you like or make a pattern of the final shape, and adhere the pattern to a piece of cardboard or thin stock using spray adhesive. Transfer the profile reference lines to the stopper blank as shown in Photo 4. Placing the pattern or image behind your lathe provides a good visual reference when turning the blank to shape.


Photo 4 – Marking reference lines on the cylindrical bottle stopper with the pattern behind it

9. Turn the blank to shape using the reference lines and pattern as guides. Use small gouges and skews for intricate cuts. As you turn the top end to shape, leave just enough material next to the cone center for sufficient support when sanding in the next step.

10. Finish-sand the turned stopper through at least 400-grit paper. If your lathe has a reverse, consider lightly sanding the stopper in reverse at the different grits. When sanding in one direction, some wood fibers may lay down, but if you sand in reverse, the micro fibers will be cut off with the abrasive, creating a very smooth surface.

11. Turn the end of the stopper next to the cone center to final shape as shown in Photo 5. Back the tail stock away from the stopper. Finish-sand the end smooth.


Photo 5 – Turning the bottle stopper to finished shape

12 . Stop the lathe off and apply a small amount of EEE Ultra Shine to the stopper with a clean lint-free cloth. Turn the lathe on at a slow speed, and use a clean cloth to even out the abrasive paste over the entire surface of the stopper as shown in Photo 6. Increase the lathe speed, and buff the bottle stopper. EEE Ultra Shine contains ultra-fine abrasives (tripoli powder) that enhance a 400-grit finish to 2000--grit finish.


Photo 6 – Applying the EEE Ultra Shine to the bottle stopper

13. Apply a coat of Shellwax cream to the bottle stopper, and allow it to dry for a few minutes. Start the lathe and at a speed of 1800 RPMS or slightly faster, buff the finish smooth. Applied over the EEE Ultra Shine, one application of Shellwax cream is sufficient.

14. Unthread the finished stopper from your lathe headstock. Apply a small amount of cyanoacrylate or epoxy into the hole in the stopper and thread the metal bottle stopper into the turned stopper. The metal should seat tightly against the bottom of the turned stopper. Immediately wipe off any adhesive squeeze-out being careful not to wipe any onto the turned stopper.

If you enjoyed making the stopper, consider turning a number more – they make great stocking stuffers.


Products Used

Bottle Stopper Blank Assortment (5 Pack). 2" x 2"x 2- 3/8". Ideal for bottle stoppers and egg kaleidoscope projects. Assortment pack contains on each of: Cocobolo, Bocote, Padauk, Bubinga, and Zebrawood. Item #:WXPCWIDE, $16.95.

(reference URL: https://www.pennstateind.com/store/WXPCWIDE.html)

Chrome-Plated Wine Bottle Stopper. Includes chrome-plated stopper, threaded coupler insert, and six-ring silicone plug. Item #: BS1, $3.45 each, buy 10 or more for $3.20 each.

(reference URL: https://www.pennstateind.com/store/BS1.html)

Bottle Stopper Chuck System. System includes; drill and tap set, 5/16in. drill bit and bottle stopper chuck (1in. x 8 tpi). $24.95

(reference URL: https://www.pennstateind.com/store/PKBSYST.html)

23/64" High-Speed Steel Brad-Point Drill Bit. Item #: PK-2364, $3.95.

(Referecne URL: https://www.pennstateind.com/store/PK-2364.html)

EEE-Ultra Shine Paste Wax, 250ml/8.6 fl oz. Use Ultra Shine as the last sanding step before applying the final finish (eg. Shellawax, Hut wax, etc.). Ultra Shine contains ultra-fine abrasives (Tripoli powder) that will enhance a 240 grit sanding step to 1200 grit or more and enhances a 400 grit finish to 2000 grit. Works on both woods and plastics. Item #: PKSWEEE, $18.95.

(Reference URL: https://www.pennstateind.com/store/PKSWEEE.html)

Shellwax Cream, 250ml Jar. Provides a flawless, non-streaking finish on large and small turnings. Creamy consistency makes it easy and safe to apply, and it buffs to a rich, deep durable shine on wood carvings or flat wood. Shellawax is a "friction polish" that dries almost instantly while applying on the lathe, producing a wonderfully brilliant shine in seconds. Non-toxic and water resistant when dry. Formulated from an exclusive combination of dewaxed white shellac and a variety of fine finishing waxes. Item #: PKSWAX, $32.95.

(reference URL: https://www.pennstateind.com/store/PKSWAX250.html)

Shop all Bottle Stopper Kits

Shop all Bottle Stopper Blanks

What is the difference between Ballpoint, Rollerball and Fountain Pen kits.

Q. What is the dfference between Ballpoint, Rollerball and Fountain Pen kits?
A. Pen users usually have strong preferences in the writing characteristics (plus price) of a pen. Since you'll never know exactly what the user will prefer – its best to be familiar with all styles.

Ballpoint Pens Ballpoint twist pens have a transmissions that extend the ballpoint refill forward. These kits generally come with “Cross™ or Parker™ style” refills that have a “paste” type of ink. There’s a spring at the nib end of the refill. The Cross™ style is the least expensive refill with the least expensive mechanism, made with 7mm tubes and consequently a favorite for beginners. Users prefer Parker™ style because of a larger ink reservoir and better writing characteristics. Pens with Parker™ style refills have larger mechanisms that require tubes 8mm or larger.

Rollerball Pens use a refill that has a liquid ink reservoir. They don’t have a twist mechanism. and come with a removable cap that can be posted onto the end of the pen that keeps the airflow away from the tip that may dry out the ink. They insert into the pen cavity with a spring at the back end pressing the point through the nib. Writers prefer rollerball pens since the liquid water based ink applies more smoothly than a ballpoint. Rollerball refills are German-made, and available in multiple colors of ink. Since Rollerball kits don’t have transmission mechanisms, they are usually easier to assemble, however, they usually have threaded more elegant components (i.e. to attach and post the cap) making them more expensive.

Fountain Pens are a traditional favorite style pen that has an ink cartridge, ink pump, nib and removable cap like the Rollerball. These inks are water based. The ink refill cartridge simply presses into a pin located on the back end of the fountain pen nib. Most Fountain pen nibs are German-made with iridium tips. Fountain Pens and Rollerball pens have a similar construction and in most cases, Rollerball nibs and refills can interchange with Fountain pen nibs and ink cartridges.

How to make a Cabochon inlay


Use s small piece of contrasting scrap wood, plastic or Corian™ to make a unique Cabochon insert that adds interest and design your bottle stopper project. First determine the diameter of the cabochon. It can be as small as 1/2” or as large as 1-1/2” (3/4” cabochon shown in the photos).

While your stopper blank is still square, drill and mount your blank onto the headstock using the Bottle Stopper chuck mount. Put a drill chuck into the tailstock and, place a Forsnter bit the diameter of the cabochon into the chuck. Turn on your lathe and drill a recess about 1/16” deep. Remove the drill chuck and mount the live center in the tailstock with the point inserted into the dimple point of the recess. Turn the bottle stopper blank to an appropriate profile rounding up to the edge of the recess. Sand and finish your stopper - the top will have a recess ready to accept your cabochon. There are many ways to turn the cabochon inlay disc - here’s one our favorites.

Penn State Indusries carries a dedicated pen blank drilling chuck that is ideal for turning a pen blank into a cabochon up to 1” in diameter. Place a pen blank (can be a short piece of pen blank scrap) in the chuck. Turn a dome to about 1/4” high at the end of your blank, match the diameter to the recess you drilled in the bottle stopper blank. Finish and polish the cabochon dome, part it off of the blank, then glue it into the recess in the stopper blank.
Additional Accessories to make a cabochon:
Forstner Bits: 3/4” Bit #FB34 $5.95, 1” Bit #FB1 $6.95, 1/2” x #2MT
Drill Chuck: #TM32 $29.95 , 1” Capacity
Pen Blank Drilling Chuck: #CSCPENCHK $79.95

The 3 symptoms of bad barrel trimming and how to fix or avoid them

The 3 symptoms of bad barrel trimming and how to fix or avoid them

There is a group of problems that keep cropping up in pen making that are very frustrating to makers. These problems have different symptoms but the most common underlying cause is a misunderstanding of one of the most basic parts of the pen making process—barrel trimming. This guide is intended to cover the basics and underlying fundamentals of this step to avoid the issues that can result from misunderstanding. What are the symptoms of bad trimming? Symptoms include:

Symptom 1: Sticking Refills

This mostly effects pens where there is a potential choke point—a section where there is only a small amount of clearance for the refill to slide through, however, in extreme cases it can impact any design. Some of the center twist pens, like the Patriot, Southwest, and Classic have couplers with only a small amount of space to accept the refill. If the coupler is not aligned properly the refill is forced to bend in order to extend through the tip. The pressure from the mechanism can force this to happen, but it wedges the refill into the tip. When the mechanism is released the spring does not have the strength to un-wedge the refill and the refill sticks. These two patriot pens below are not trimmed straight. When fully pressed the refill is not centered, as can be seen in the right hand picture. The refill is not able to be pushed any closer to the center line because of the misalignment.

An easy way to diagnose this is to look down, or even remove, the tip and see how the refill aligns. Another way is to remove the mechanism and move the refill forward and back by hand, checking for places where the refill rubs against the coupler. When diagnosing it is important to rule out wedging caused by a retaining pen spring assembled backward. The right picture shows the spring in the correct orientation.

Symptom 2: Refill not extending

A further example of misalignment can be seen in the next picture. This pen is so out of alignment that the refill cannot exit the tip.


Note that the back end is in line with the straight edge while the front end deviates greatly

All three of the above pens were repaired and able to function by disassembling and carefully re-assembling. This is not ideal because none of them will be perfect because of the gaps. The best case would be to re-trim the ends. This risks the refill being unable to retract fully from being shortened, however once it has gotten to this point, it is the only full solution.

Symptom 3: Click Failure

A standard, two-barreled click pen needs a certain length of tube to house the mechanism. Too long and the mechanism slides in the tube; too short and the mechanism is compressed. A compressed mechanism may crack, making it impossible for the refill to remain extended, or it can deform causing the mechanism to be sluggish, stiff, or not function at all.

Once this has happened the solution is to disassemble. If the barrel is too long, it can be trimmed down. Which is easy since the proper length should be the tube length. If the barrel is short, the only solution would be complete upper barrel disassembly. Line up the internal parts and mark on the plunger guide any excess length. The plunger guide length then must be ground down to make all the parts an exact fit. Obviously this is not a good situation.

Fundamentals of Barrel Trimming: How to avoid these issues

So, the question is how does one avoid these issues? First, we have to understand what barrel trimming is and what it does. What is referred to here as barrel trimming (also called end milling) does two important things. First, it cuts the ends of the barrel so that they are perpendicular to the tube. Second, it trims the excess wood so that the finished barrel is the proper length. Incorrect methods can affect either of these.

There are several methods to trim the barrel. Primarily, a barrel trimmer is used. The barrel trimmer consists of a spot facer with 2 or 4 blades and a pilot shaft of appropriate diameter for the tube. The trimmer is put in a drilling device and the pilot is inserted into the tube. This method is very reliable if done properly, which will be addressed shortly.

Another common method is to use a sanding disk. This method is effective and addresses the issue of delicate blanks that can be torn apart by trimmer blades. A third, but uncommon method is to use a saw to cut off the excess material. These last two methods require a jig to align the piece.

Fix 1: Proper Alignment

The first thing to address is alignment with the tube. If the tube and the ends of the barrel are not aligned, there will be problems as demonstrated in the first section of this guide. It is important to understand why relying on the tube is the only way to guarantee alignment.

The most common reason for improper trimming is to use the edges of the blank to guide the trimming alignment. Many people have used this method and on some pens they will be successful in function, although the appearance may look odd with gaps or bent appearance.

When a pen blank is drilled, the perfect hole will be centered; it will be exactly the right diameter to accommodate the tube and glue—no more, no less; and it will be completely parallel to the outside edges of the blank. In other words, the perfect hole is not going to happen very often.

Even if the hole is straight, there will be some wiggle room between the hole and tube for gluing purposes. When glued, the tube will not be centered in the hole. Even if the tube aligns with one side of a blank, it can still be off on another side. It is obvious that the blank can not be an alignment guide. The best penmakers understand that it is the tube that must be aligned to, not the blank.

This is the reason why the barrel trimmer has a pilot shaft. The shaft will align the trimming blades so that they are perpendicular to the tube. This will make it so that the when finished, the ends of the barrel will be straight across the end of the tube. In order to accomplish this alignment with sanding or sawing, a jig must be used that will align the tube perpendicular to the saw or disk. Ideally the jig will have sleeves that will act like the pilot shafts on a barrel trimmer.

The second common mistake is to have the trimmer and the blank both held in fixed devices, such as using a drill press with a vice when trimming. This can destroy the blank and the tube, it can interfere with the fit of the pen parts, and it can cause misalignment.

A: The impossible ideal: barrel, hole, tube, and shaft lined up perfectly. This will never happen in the real world.

B: This is closer to actual trimming. Barrel and tube are not aligned. The trimmer is aligned to tube and cuts a surface straight across the tube

C: In this picture the barrel and trimmer are aligned, but the tube is not lined up to either. The shaft will rub into the tube wall and ruin it. Even if the tube is slightly damaged, at best, the barrel ends will be slanted on the pen, causing uneven gaps.

Once again, the tube must be what guides the alignment. If the barrel is held in a vice, and the trimmer is in a drill press, the alignment will be determined by the blank in relation to the vice, platform, and press. In the best setup, either the trimmer or the blank must be loose. It must be held safely, but it must be allowed to move so that the tube aligns with the trimmer shaft. The same thing applies to other trimming methods. Whatever lines up the tube can be fixed, but the barrel must be loose. If one prefers to have the blank in a vice, then the trimmer should be in a hand held tool, such as a portable drill.

You also want to prevent the barrel from spinning, but still allow it to align with the trimming surface. Using a drill press, this can be accomplished with pliers or any handheld gripping device. A handy tip to consider here is that if the barrel is held too firmly immobile, a dig-in can tear out sections of the weakest link, namely the blank.

Holding the barrel loosely – just tight enough to prevent it from turning but loose enough for it to move if the trimmer digs in – will help prevent blowouts. A helpful tool for this is a ratcheting clamp with hinged feet, like the one pictured to the left. It will hold the piece but not so tightly that the blank can’t spin away if necessary.

Fix 2: Trimming Sleeves

Trimming sleeves have a very simple function. The reason for sleeves instead of shafts is a bit of history. For a long time, pen kits had just a few tube sizes. There were 7mm, 8mm, 3/8”, and 10mm tubes. Barrel Trimmer pilot shafts were created in order to fit the inside diameter of these tubes, we will call these sizes the core shafts and they make up most of the tube sizes that come with kits. Eventually there was the addition of the 8mm pencil tube; the inside diameter of which was slightly bigger than a 7mm trimming shaft but too small for the 8mm shaft. The solution was a barrel trimming sleeve that would fit over the 7mm shaft and act as an adapter and make up the difference.

Barrel trimming sleeves all work on the same principle. The sleeve is slid over one of the core shafts (usually 7mm) and then the entire assembly is put into the barrel and is used the same way as a standard barrel trimmer (see picture below). One thing to keep in mind is the length of the trimming sleeve compared to the tube. You may have to drill a hole to accommodate any extra sleeve length. Also, the interior of the tube must be cleaned manually before using the sleeve; there is no scraper on the sleeve so the interior of the tube is not automatically cleaned as it is with the trimmer pilot shafts. With the growing popularity of using sanding disks to trim, PSI has now made sleeves available to accommodate 8mm, 10mm, and 3/8” tubes on the sanding jig shaft.


Anatomy of using the barrel trimmer with sleeve

When using the sanding disk, the ideal jig will hold a rod that points perfectly straight into the face of the disk. PSI sells such a jig #PKSQUARE. It has a base rod that is suitable for 7mm tubes, and trimming sleeves #PKTRIMSET can be purchased to adapt to other tube sizes.

Using sanding disk jig with sleeve

Fix 3: Match the barrel length to the length of the tube

The second purpose of trimming is to match the barrel length to the length of the tube. Since we want to combine the alignment aspect with the length aspect of trimming, we cut the blank to a length longer than the tube and cut it back when trimming. When this is done, care must be taken to keep the length matching the tube. Pen kits are designed to operate as if the turned material is not there. Meaning the optimal function can be observed by simply pressing the kit together straight out of the package.

A huge problem can be created in many kits by overtrimming. This happens when a bit of zealousness with the trimmer shaves of a bit off the brass tube. This can occasionally happen to even the best penmaker, but it should not happen on every pen, every trim. Some pen makers will talk of trimming until they see the brass turn shiny – a technique referred to as “kissing the brass”. It can be an easy way to see when to stop trimming without having to back off and check, but what happens is that it can get out of hand, and then it’s no longer a peck on the cheek!

There is no way to measure how much of the brass tube will be removed when you notice the brass start to “shine”. It could be very little, or it could be 1/8”. For some styles, a shortened tube can be adapted to, but others are harder to change. While there is some tolerance in the pen lengths and refill travel, for the most part, the kits are designed to have the refill extend and retract in an approximate range.

If the brass gets accidentally hit while carefully trying to get as close as possible, very little is removed. When the intention is to stop once the trimmer starts cutting into the brass, there is a good chance that a good deal of metal will be removed. If you calculate just trimming 1/64” off of each end what happens is that the tube is shortened by 1/32”.

This doesn’t seem like a lot, but that should be put in perspective. The pen tip usually sticks out around 3/32” and retracts about 3/64” inside the tip, so the travel is about 9/64”. Now if the kit travels just a little less, say 1/64”, then that little bit of overtrimming could make it so that the refill never fully retracts. If the overtrim is more than 1/32”, the pen is guaranteed not to retract fully. How do you check if you shaved off 1/32” or just barely touched it? You really can’t tell until after it goes to the lathe, and you can’t put the material back once you discover it’s too short. There is a solution to an overtrimmed pen, and that is to switch refill styles. If the barrel has been overtrimmed by 1/8”, and the pen normally takes a Parker style, switching to a Schaeffer Ballpoint Stlye “K” will provide you with a refill that is 1/8” shorter and will still work in most Parker style pen kits. Schaeffer is a brand name refill and there is no generic version, so it will cost more to solve the problem in this way.

The best way is to avoid the problem entirely. When trimming, constantly check how close you are to the tube. The closer you get to the tube, the more frequently you should check and the less time you should spend actually applying the trimmer. Always clear off any debris that interferes with your ability to see where the tube is in relation to the end—never assume you have some room to spare. You should also never trim with aggressive pressure because that will increase the chances of hitting the tube or tearing up the blank. By the time you are finished, you should be practically bouncing the trimmer down and back up. If you accidentally hit the tube at this point, don’t panic. An accidental hit will be minor compared to intentionally trying to hit the brass.

The lower barrel of the pen pictured above was overtrimmed by 3/64"

Fix 4: Properly clean and de-burr

The final process that will be covered here is preparing the tube for turning and pressing. Cleaning can be done with a trimmer pilot shaft of appropriate size. Bear in mind that the trimmer shafts are not a perfect fit in the tubes, there is a bit of clearance to allow the shaft to move freely. Because of this, it is possible to have some glue remaining in the tube after trimming. This can lead to problems later on. You don’t always need to do anything further to clean the tube, but if you look and see that there appears to be something remaining in the tube especially near the ends, clean it out with sandpaper. Again, do not be aggressive or you will widen the tube. If there is a significant amount of glue left in the tube, use a smaller tube, or even a threaded rod that will fit inside the tube to help clean it out.

Another good step is deburring or chamfering. This clears out any obstruction in opening of the tube caused by cutting tubes or accidentally trimming the brass. Burrs can interfere with pressing pen parts and even mounting the tubes on the bushings. De-burring is also helpful in widening the tube entrance for easier starting when you press in the parts.

There are two tool styles recommended for this, which are pictured. One is the counter-sink style #BGCAM (top) and the other is the revolving style #MSDEBURR(bottom). The triangle style included with pipe cutters is actually not recommended here because those tend not to cut and the goal is to actually trim a bit of the metal.

Using the countersink style is rather simple. Just insert into the tube and twirl. This will cut a taper in the end of the tube and also cut any burrs away. The revolving style is used by inserting the tip of the cutter into the tube and performing a quick stirring motion. The swiveling blade will align itself to the motion and cut away any burrs in the metal. Both of these styles are available from various tool companies. The ones pictured are sold by PennState Industries.

Remember that being careful in preparing the tube and blank is quite possibly the most important thing to keep in mind when penmaking. The most beautiful pen body will not make a difference if the pen does not function. A lopsided gap will ruin the best work. So always make sure to spend as much attention to trimming as you would in turning. It will save a lot of frustration and time later on.

3 Tricks to make glue work for you

3 Tricks to make glue work for you

1. Keeping glue in its place with this tidy tray

Minimize the mess – and frustration – when applying glue to pen tubes by using this super-simple glue tray. To make one, cut a ¾"-thick, 2"-wide, 4"-long piece of scrap wood. Then, drill a ⅜" hole lengthwise down the center of it. Next, use your bandsaw to cut the piece in half, cutting through the center of the hole. Voila! You have two trays with a “trough” for the glue. When you are ready to glue your pens, fill the trough with glue and then roll the tubes in it.

2. Fix defects with sawdust

Don’t let voids, cracks, and small tearouts ruin your blank. When you encounter these defects, keep turning the blank until it is just a little larger than the finished diameter. Then, remove the tool rest and sand the blank from the underside, making sure to catch the sanding dust with the sandpaper. Put some thin-viscosity cyanoacrylate (CA) glue in the void, and then pack it with the sanding dust you collected, wearing gloves to protect your fingers. (For larger defects, consider using small turning shavings.) Apply a coat of CA glue on top of the packed area and add more sanding dust if necessary. After the glue cures turn your blank down to the finished size.


3. Use a potato to keep glue in its place

Glue has a tendency to get on the inside of brass tubes when gluing them in blanks. That excess glue takes time to remove. And if not removed, the glue will create problems at assembly time. To get ahead of the game, seal tube ends with potato plugs. Just cut a ¼" slice of raw potato and press each end of your tube into it. The plugs will come out when trimming the blanks with a barrel trimmer. If using cyanoacrylate (instant) glue, wipe down the outside of the tube before gluing as the potato’s moisture will speed the curing time.


How to use a potato to keep glue in its place

How to use a potato to keep glue in its place

Glue has a tendency to get on the inside of brass tubes when gluing them in blanks. That excess glue takes time to remove. And if not removed, the glue will create problems at assembly time. To get ahead of the game, seal tube ends with potato plugs. Just cut a ¼" slice of raw potato and press each end of your tube into it. The plugs will come out when trimming the blanks with a barrel trimmer. If using cyanoacrylate (instant) glue, wipe down the outside of the tube before gluing as the potato’s moisture will speed the curing time.


Make an Inexpensive Threaded Headstock

Make an Inexpensive Threaded Headstock

To create your own threaded headstock, mount a piece of hardwood at least 1" thick to your metal faceplate. Turn the stock round and use a pencil to mark concentric rings until you’ve found dead center of the auxiliary faceplate. Drill an 11/32” hole 1” deep into the auxiliary faceplate. Epoxy a 3/8" x 2 1/2" bolt or 3/8" threaded rod 2" long, into the hole and let the epoxy cure. Once the epoxy has totally hardened, use a hacksaw to cut the head of the bolt off so just the threading is exposed. Turn the lathe on and use a file to to create a slight chamfer on the end of the threaded rod. Then thread the workpiece onto the exposed threaded end


How to use a wrench or wood caliper to check the diameter

How to use a wrench or wood caliper to check the diamater

When turning bottle stoppers, bottle openers, and other projects where you want a specific diameter from one project to the next, an open-ended wrench is the perfect tool to use as a caliper. To determine the diameter needed for the turning, select a wrench with an opening size to match the needed diameter, and use it as a quick measuring tool when turning the project to shape. Or, if the wrench is too thick, transfer the opening size to a thin piece of stock, and cut it to size, and use that as a caliper. For example, when turning bottle stoppers, find a wrench whose opening measures the end of the chrome stopper that mates with the turned wood piece. Then, when turning the wood part of the stopper to shape, use the wrench or wood caliper to check the diameter of the turning until it is the desired diameter. When the turning reaches the necessary diameter, the tool will slip over the turning. This tip also works well when turning tenons to a particular diameter to fit into a mating mortise.

How to cut your pen blank with a table saw sled thin-kerf blade combination

Marlen Kemitt Tips

How to cut your pen blank with a table saw sled thin-kerf blade combination

If the table saw is your choice for cross cutting pen stock to length, consider this table saw sled and thin-kerf blade combination. The sled base, cut from ½” baltic birch plywood, measures 6x16”. The support, cut from the same material, to which the hold down clamp is screwed to measures 4x16” and is glued to the base with the back edges flush. As a safety indicator, consider painting a red “caution area” where the blade enters the support. The distance from the clamped-down stop to the inside edge of the blade is determined by the length of the brass pen barrels you'll be using. To cap it off, use a thin-kerf blade for cross cutting the stock, which minimizes the stock lost to the kerf, allowing the grain in the two matching blanks to match up better for the final product.

An Easy Way to Take Measurements at Your Lathe

Marlen Kemitt Tips

An Easy Way to Take Measurements at Your Lathe

We often need to take measurements at the lathe. Rather than constantly worrying about carrying a tape measure, simply use a piece of double-face tape to adhere a rule to a flat spot on your lathe. You can also use self-adhesive rules like those used on a table saw and bandsaw fence guide. If the tape protrudes beyond the edges of the rule, trim is flush with a crafts knife.

Make a Tool and Supply Tray for your Lathe Bed

Make a Tool and Supply Tray for your Lathe Bed

Keep your turning, sanding and finishing tools and supplies close at hand with a custom-built tray. To make the tray use a piece of ½” plywood for the base with a cleat on the bottom side to fit snugly between the lathe bed rails. Band along all four sides of the base 1” taller than the base to prevent your supplies from sliding off. When you're finished your project, simply return the tools and supplies to their normal storage area.

Working around blowout

Working Around Blowout

No matter how careful you are or how sharp your drill bit, the bottom end of a blank being drilled for a barrel can blow out or chip when the bit exits the bottom of the blank. Unfortunately, a few woods and acrylics are more apt to blow out than others. While repairing a blown-out blank is difficult if not impossible, you can easily work around such stock by simply cutting your blanks longer than needed for the mating tube. For example, if the stock you are drilling is blowing out and you normally crosscut your blanks 1/16” to 1/8” long, cut them ¼” long. After drilling the hole simply re-crosscut the blown-out end to remove the damage.

Is your Turning Tool Not Sliding Smoothly? How to Fix

Is your Turning Not Sliding Smoothly? How to Fix

In addition to supporting your lathe tools the top edge of a tool rest must be nick and dent free. Unfortunately, some tool rests are manufactured from relatively soft metals and nick and scratch quite easily. And, lathe tools are often made of steel harder than the rest itself.

Run a finger along the top edge of your tool rest to feel for imperfections. Small indentations in the tool rest can make it difficult to smoothly slide a turning tool along its top edge, resulting in unwanted changes in the cut being made to the turning. To maintain the top edge of a tool rest, use a fine machinist’s file for the initial smoothing. Using long, smooth strokes, file from one end of the rest to the other. Check the edge with a quality straightedge to ensure you’re not removing more stock from the center of the rest than the ends. With a clean cloth or paper towel wipe the tool rest to remove any residue from filing.

Once the dents and nicks have been filed smooth, wrap a piece of 220-grit paper around a block of wood and use the same long smooth strokes to further smooth the surface. Finally, rub a light coat of wax on the tool rest top edge. The wax not only helps tools slide smoothly along the edge when making cuts, but also helps seal and protect the edge. The wax will wear off, so recoat frequently.

How to save your mandrels with equal pressure

When applying pressure to create friction and heat to cure a finish, it is easy to place the cloth on one side of the pen blanks and push. Problem is, if you are not careful and apply too much pressure you can bow and even bend the mandrel. The best way to apply pressure evenly is to lightly pinch or squeeze the pen barrel between your fingers. Properly applied the pressure cures the finish without putting undue pressure on the mandrel.

Know Your Viscosity at a Glance

With numerous bottles of cyanoacrylate in the shop and aging eyes, it’s easy to grab the wrong bottle for the job at hand. There are several viscosities of cyanoacrylate; thin, medium, thick and gel. Anything but thin works for adhering tubes to blanks, but for applying a finish to turned blanks, use just thin or medium. Since the print on these bottles can be very fine, mark the designation letters on the bottle with a thick black marker. T for thin, M for medium, TH for thick, G for gel, and F for flexible. It makes grabbing the wrong bottle almost impossible.

How to build a simple jig to cut pen blanks to length

For a quick and easy method for cutting pen blanks to length, build this simple jig. Make the base from either ½” or ¾” plywood. This one measures 6x12”. Add a support, 3x12”, for attaching the hold-down clamp. Glue a miter-gauge guide to the bottom of the base for keeping the jig square to the blade. As a safety indicator, consider painting a red “caution area” where the blade enters the support. Finally, add a stop, held in place with the hold-down clamp for consistent lengths each and every cut.

How to stop splatter

If you've ever visited another woodturner's shop, nine times out of 10 the area behind the lathe is a disaster area marred with splatter that has occurred during the finishing process. No matter how careful turners are, a bit of splatter seems inevitable, and over time, that splatter can build up and turn really ugly and difficult if not impossible to remove. A quick and inexpensive solution is to create a "curtain" to hang behind the lathe when finishing or wet sanding. A simple way to accomplish this is to adhere a section of an inexpensive tablecloth or shower curtain from a dowel or other length of wood. Drive a screw eye into each end of the wood rod and use those to hang the splatter gatherer behind the lathe. The curtain comes in especially handy when spraying finishes as well. And, if you don't have dust collection at your lathe the curtain also works well to deflect flying chips.

Washer does double duty

When turning bottle stoppers and other projects where the outside diameter of the wood to the mating metal part is important for a flush fit and you don’t have an existing chuck with the necessary diameter, washers make an inexpensive and reusable guide. For example, when turning the bottle stopper shown, the end that mates with the chrome stopper looks and feels best when the surfaces are perfectly flush. To accomplish this, file or grind one or two washers to the same diameter as the mating section of the chrome stopper. Slide the washers over the threaded mandrel. Then, turn and sand the stopper bottom end to same outside diameter as the washers. Not only do the washers provide an exact diameter guide, but they allow clearance to turn and sand the stopper’s bottom end without turning into the auxiliary wood faceplate.

How to stop bending your mandrel

Instructions often state, “don’t over tighten the tailstock when mounting the pen mandrel between centers.” Problem is you don’t know you’ve overtightened until it is too late and you’ve bent or bowed the mandrel shaft. Not only is it frustrating to have to buy a new mandrel, but you also lose a few days of turning in the shop. The solution is simple, a mandrel saver (under $20), supports the perimeter of the mandrel without putting lineal pressure against the end of the mandrel. The mandrel saver securely captures the tailstock end of the mandrel without applying pressure in the direction of the headstock. Problem solved! You’ll never bend a mandrel again.
Shop Mandrel Savers

How to Make a Watch Parts Pen Blank By Barry Gross


I chose to make this watch parts blank paired with Penn State Industries new Steampump Pen Kit as a really great Steampunk inspired project.

1: Cut a piece of colored foil, purchased at any crafts store (I choose blue to highlight the watch parts we will be using later). Make sure when you cut the foil you have enough to wrap around the pen tube and overlap the foil slightly. Apply a liberal amount of Mod Podge (white glue) to the colored foil.

2: Wrap the foil around the tube, assuring the overlap piece of the foil is tight to the tube. Role the foil coated tube on a flat service assuring that any air bubbles have been removed and the foil is tight to the pen tube.

3: Remove any excess foil from the ends of the tube with either a small pair of scissors or use an exacto knife to trim the ends flush with the end of the tube. You are doing this so when you plug the ends of the tube, you will obtain a tight seal on the tube.
4: Use the end of the Exacto knife to “texture” the foil to hide the seam and to make the blank more visual pleasing.
5: Start by using small watch parts available thru online internet shops such as Etsy and Ebay. Use small pliers and carefully bend each gear or part so it will fit snuggly onto the tube.
6: Glue each watch piece to the foil backed pen tube by placing a small drop of medium CA glue, and use an accelerator to dry the glue so you can move on to the next piece. Continue gluing the watch pieces to the foil backed tube until YOU are satisfied. Some people use less parts some use more, it is your pen so make it the way you want it!
7. Finished Pen Tube: Once you have glued all the pieces onto the pen tube you are now ready to cast your masterpiece turn it then make your pen.

7 Steps to making a Pool Cue Kit on your Midi Lathe

A lathe with a minimum of 32” Bed. Turning tools: Spindle Gouge, parting tool and 1” skew essential. The Turning Accessories Combo Set #CUEHWS is essential. Select a Shaft and Butt Blank set from page 4. Select a finish accessory décor set. We recommend starting with the least expensive Blank and décor sets to get you started. (i.e. Maple Blank set #CUE01, Economy décor set #CUEJS01)

1) Setup the lathe as shown in Fig 1 (Butt End) Install the Female Chuck mandrel in the headstock. Install extra banjo, long tool rest and Follow rest along the bed. Thread the Male insert into the mandrel. Press the 60deg live center into the hole in the butt end to support the wide end of the Butt blank. Adjust the long tool rest to follow the slope of the Butt Blank. Lock everything in place.

2) Cutting Tenons Measure the décor components you selected and cut tenons at both ends to firmly accept the ID of joint collars and Butt collars selected. Test the Collars for fit before proceeding. Leave the tenon a bit long at the center connection … you’ll want to part of the extra exactly square to the collar for best Cue performance. Glue the Collar at both Ends with epoxy.


3) Turn the taper Mark 6 graduated diameters along the tool rest. Use a parting tool to cut spindle to those depths, use a caliper to measure accurately. Cut a taper to the diameters marked. Use the Follow Rest as instructed to avoid whip. Cut just short of the finish diameters for sanding. Cut smooth transitions through the décor components. Run a straight edge along the slope to check for a straight cut.

4) Finishing Sand the Blank and collars together with graduated grits for smooth transitions at the connections. Use a block of wood with the sandpaper to assure a flat surface. Finish with a durable finish of choice. We recommend the GluBoost Master Finishing kit #PKGBCSET for a great result.

5) Setup cue tip end Install the Male Cue mandrel in the headstock and mount the Cup center on the 60 degree live tailstock center. Screw the shaft onto the mandrel and support the tip with the cup center. Follow steps (2) through (4) but cut a tenon for the joint connection first. Leave the tip end until you’ve cut, sanded and finished the shaft. Leave the wood “bubble” on the tip as you cut the tenon for the tip ferrule. Part off the “wood bubble”.

6) Finish the Tip Remove the tailstock cup, move the Follow Rest down to the tip end, slide on the ferrule and glue in place. When dry, turn the ferrule down to about 13mm dia. Part the tip end to a flat surface. Glue on the tip and press with the tailstock end and allow to dry. When dry, turn sand and finish the Cue tip and Ferrule together to the same diameter.

Final Steps Select a weight to insert into the Butt end. The amount of weight is a matter of personal choice, but the weight allows play and break action that the user prefers. Screw the weight deep as possible into the butt end cavity. Cap the butt end by pressing the rubber bumper firmly into the butt end. Your hand turned cue Your hand is now finished! Enjoy your cue!

How to Choose the Best-Looking Grain

After ripping your own pen-blank stock square, you don’t necessarily want to start cross cutting from an end of the long blank material. Look at the wood carefully and mark crosscut lines for the best-looking grain and X out problem areas. As shown in the maple burl stock below, the best figure can be at the ends of the stock or in the middle. It varies from piece to piece. Since the material selection and kit selection determine the final outcome of the pen, take your time and make sure to use the best material possible. Since the end, or nib of the pen gets the most visibility, consider crosscutting the stock so the best figure will be at the bottom of the pen.